
To safely thaw a frozen pipe, immediately shut off the main water valve, open the affected faucet to relieve pressure, and apply safe, gradual heat—such as a hair dryer or heating pad—working backward from the faucet to the frozen blockage to prevent a burst pipe.
What you need to know right now is that the next 30 minutes matter more than anything else, and how you approach this (hopefully slowly and carefully, not fast and forceful) is the difference between a minor fix and a flooded bathroom.
This guide explores the critical steps for identifying and safely resolving frozen plumbing:
- What should you do the moment you suspect a frozen pipe?
- How can you confirm if your pipes are actually frozen?
- What is the step-by-step process to safely thaw accessible pipes?
- How do you handle inaccessible pipes in walls or underground?
Let’s walk through exactly how to thaw frozen pipes safely and get your water flowing again.
Learn More About Our Plumbing Repair Services Today!
Key Takeaways
- Start by shutting off your main water valve and keeping the faucet open to relieve pressure before you apply any heat.
- Use safe, gradual heat sources only — like a hair dryer, space heater, or heating pad — and never use an open flame on frozen pipes.
- Thaw frozen pipes from the faucet end back toward the frozen section so melting ice has somewhere to go and pressure doesn’t build behind it.
- If a pipe is hidden in a wall, ceiling, or underground — or you see bulging, cracks, or water stains — stop and call a licensed plumber immediately.
- Once water is flowing again, inspect carefully for leaks and put prevention in place so the pipe doesn’t refreeze.
What Should You Do the Moment You Suspect a Frozen Water Pipe?
It’s a sub-freezing Wasatch Front morning. You turn on the tap and get nothing, or maybe only a trickle. The instinct is to grab something hot and hit the problem hard. Resist that. What you do over the next half hour determines whether this remains a minor inconvenience or turns into a major water-damage event.
According to 2024 Consumer Affairs data, water damage from frozen and burst pipes accounts for exactly 23% of all U.S. homeowners’ insurance losses, with average claims exceeding $12,500. That’s not meant to scare you — it’s meant to show why acting correctly matters more than acting fast.
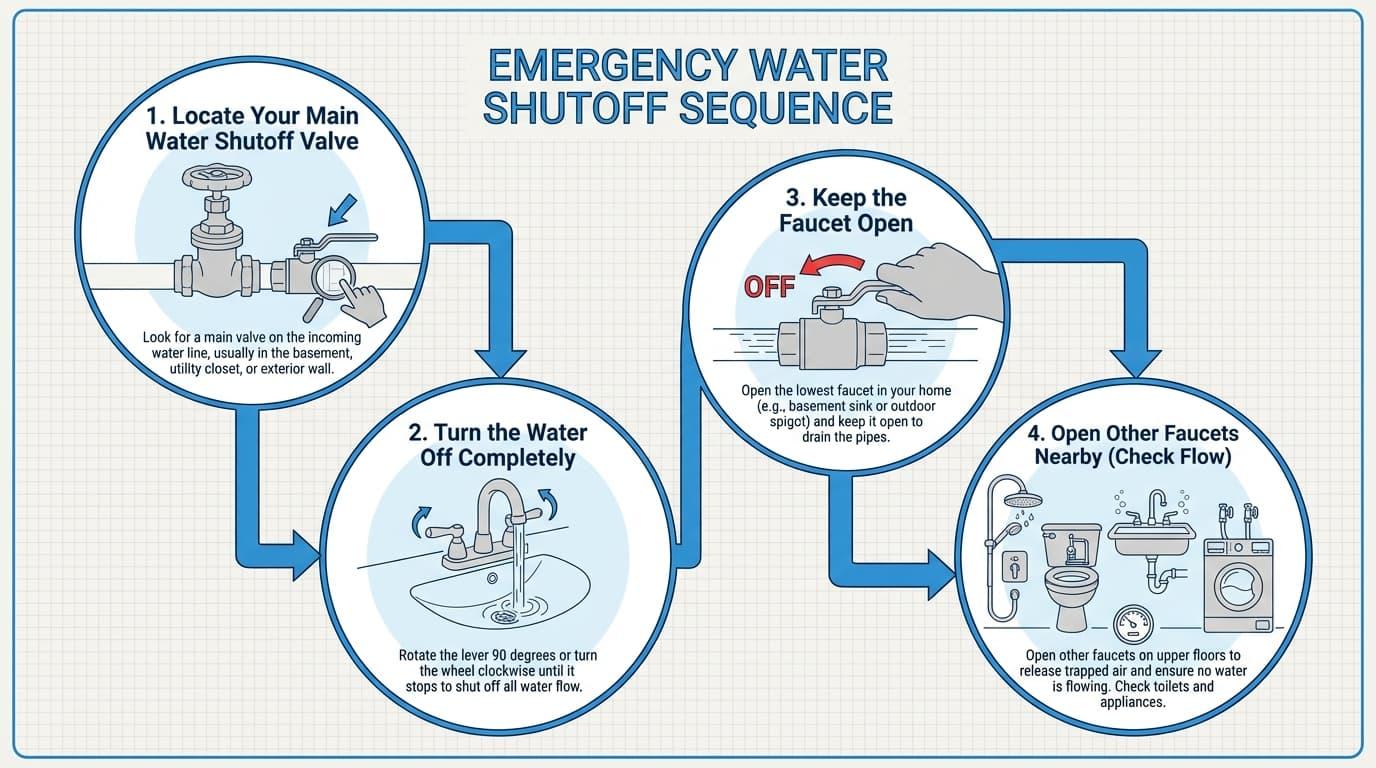
Your First Move
Locate your main water shutoff valve. It’s typically near your water meter, in the basement, or in a crawl space. Turn the water off completely. This one step caps your potential flood damage at 10–20 gallons, rather than hundreds, if a pipe bursts during thawing. If the pipe cracks or bursts during thawing — which is more common than most homeowners expect — pipe repair services for burst or damaged frozen pipes are available 24/7 to stop the damage and restore your water supply.
Your Second Move
Keep the faucet open — both hot water and cold tap handles fully open. This relieves pressure in the line and creates an escape path for water once ice starts to melt. Open other faucets nearby to help identify which specific line is frozen.
You also want to check if all fixtures in your home are dry, but your neighbors still have water; the problem likely sits in your main supply line. That’s a job for a licensed plumber with specialized equipment — call immediately rather than attempting DIY repairs on buried or meter-side lines.
Learn More About Our Plumbing Repair Services Today!
How Can You Confirm If Your Plumbing Pipes Are Actually Frozen?
Not every water pressure drop means frozen pipes. Sometimes it’s a clogged aerator, a municipal water supply interruption, or a fixture issue. Before you start applying heat to anything, confirm you’re actually dealing with a freeze.
Classic Symptoms Of A Frozen Water Pipe
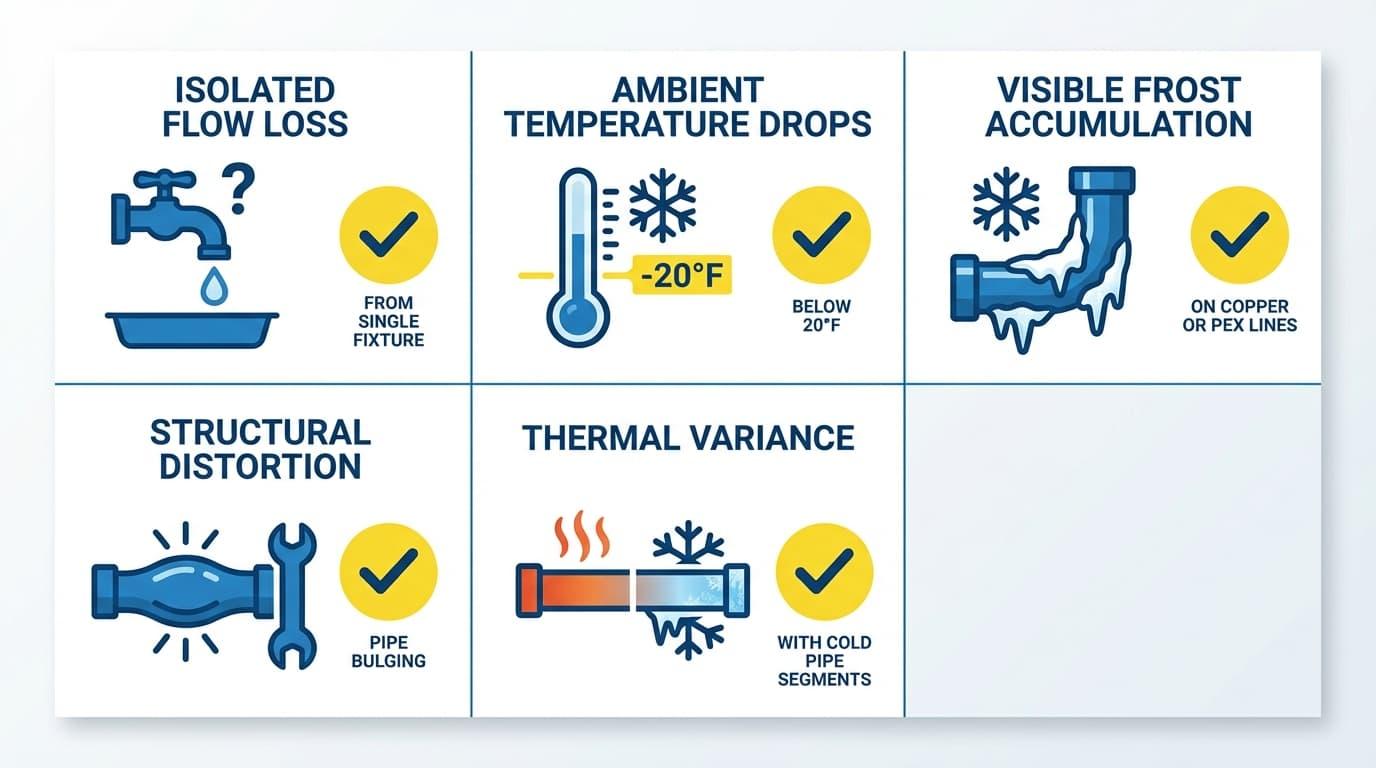
- Before applying heat, verify these five primary diagnostic indicators:
- Isolated Flow Loss: Water yields only a trickle from a single fixture while adjacent faucets operate normally.
- Ambient Temperature Drops: Outdoor temperatures have sustained below 20°F (-6°C) based on NOAA 2025 guidelines.
- Visible Frost Accumulation: Exterior condensation has frozen into visible ice crystals on exposed copper or PEX lines.
- Structural Distortion: The pipe casing exhibits slight physical bulging or widening at the site of the ice blockage.
- Thermal Variance: A specific segment of the pipe feels dramatically colder to the touch than surrounding plumbing.
Likely Places To Check First
Frozen water pipe problems almost always start in unheated areas. Focus your inspection on garages, crawl spaces, exterior walls, under sinks on outside walls, and areas near foundation vents. In Utah’s high-elevation communities like Park City, dry winter air can shrink wood framing around pipe penetrations, creating cold drafts that speed up the freeze.
A quick test: If your neighbors have water and some of your taps are flowing normally, you’re dealing with a localized frozen section — not a city water supply problem. That’s actually good news, because it means the fix is likely within reach.
What is the Safest Step-by-Step Method to Thaw Accessible Frozen Pipes?
Thawing a simple, accessible frozen pipe is a manageable DIY job if you work slowly and use the right tools. Rushing the process or reaching for the wrong heat source is exactly what causes burst pipes and fires. Here’s how to do it right.
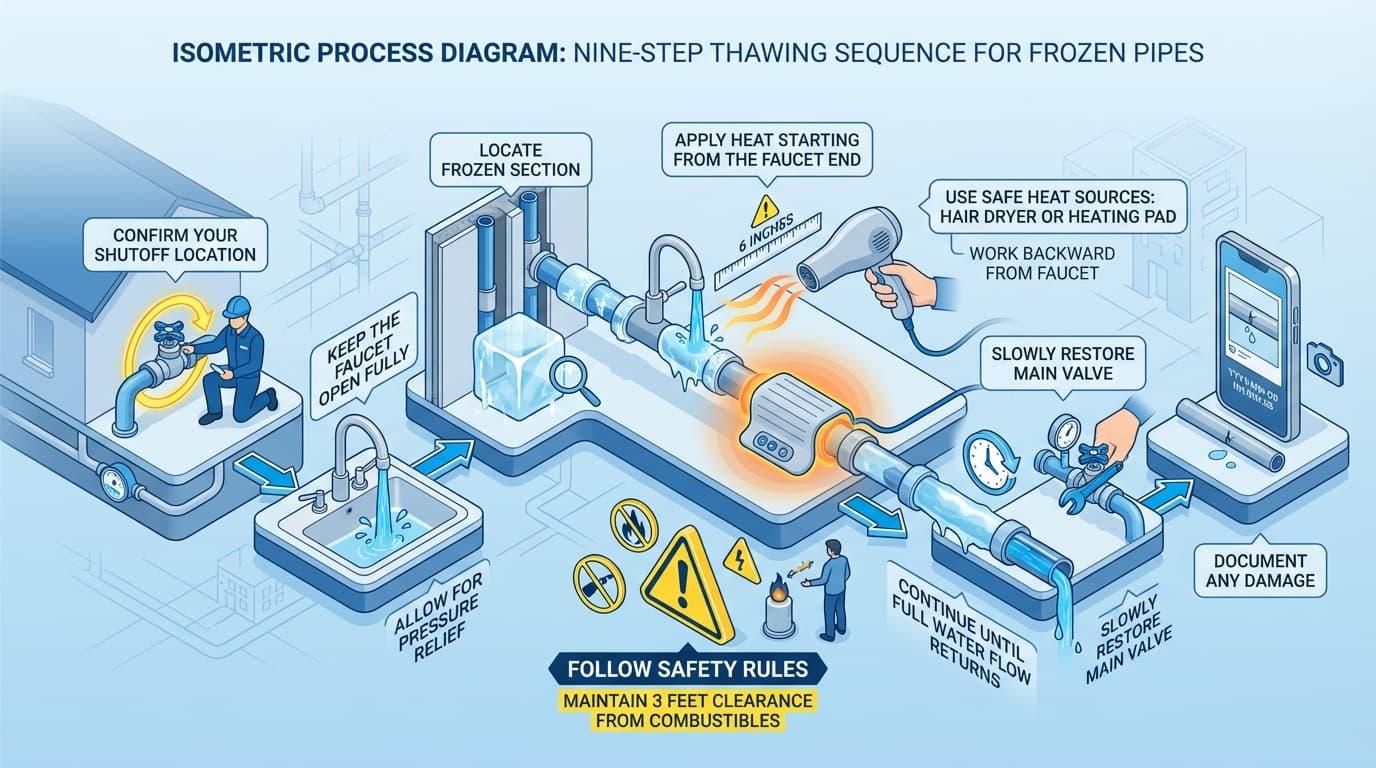
Step 1: Confirm Your Shutoff Location
Before applying any significant heat, know exactly where your main water valve is. If you spot any leaks or visible bulging, or if you’re working in a tight space, turn the water off completely before you start.
Step 2: Keep The Faucet Open Fully
Both hot water and cold tap handles should be wide open. This lets melting ice drain out as you work and keeps pressure from building inside the pipe.
Step 3: Locate The Frozen Section
Trace the pipe from the non-working faucet backward through your basement, crawl space, or cabinet. Feel for extremely cold spots, or look for visible frost on the pipe’s surface. Ice blockages in half-inch water pipes are often 2–10 feet long, so cover the whole run.
Step 4: Apply Heat Starting From The Faucet End
This is the most important part. Always work from the faucet toward the frozen area — never from the middle outward. When ice melts, it needs somewhere to go. If you heat the center of the blockage first, water has no escape route, and that’s exactly how a pipe bursts.
Step 5: Choose Your Heat Source
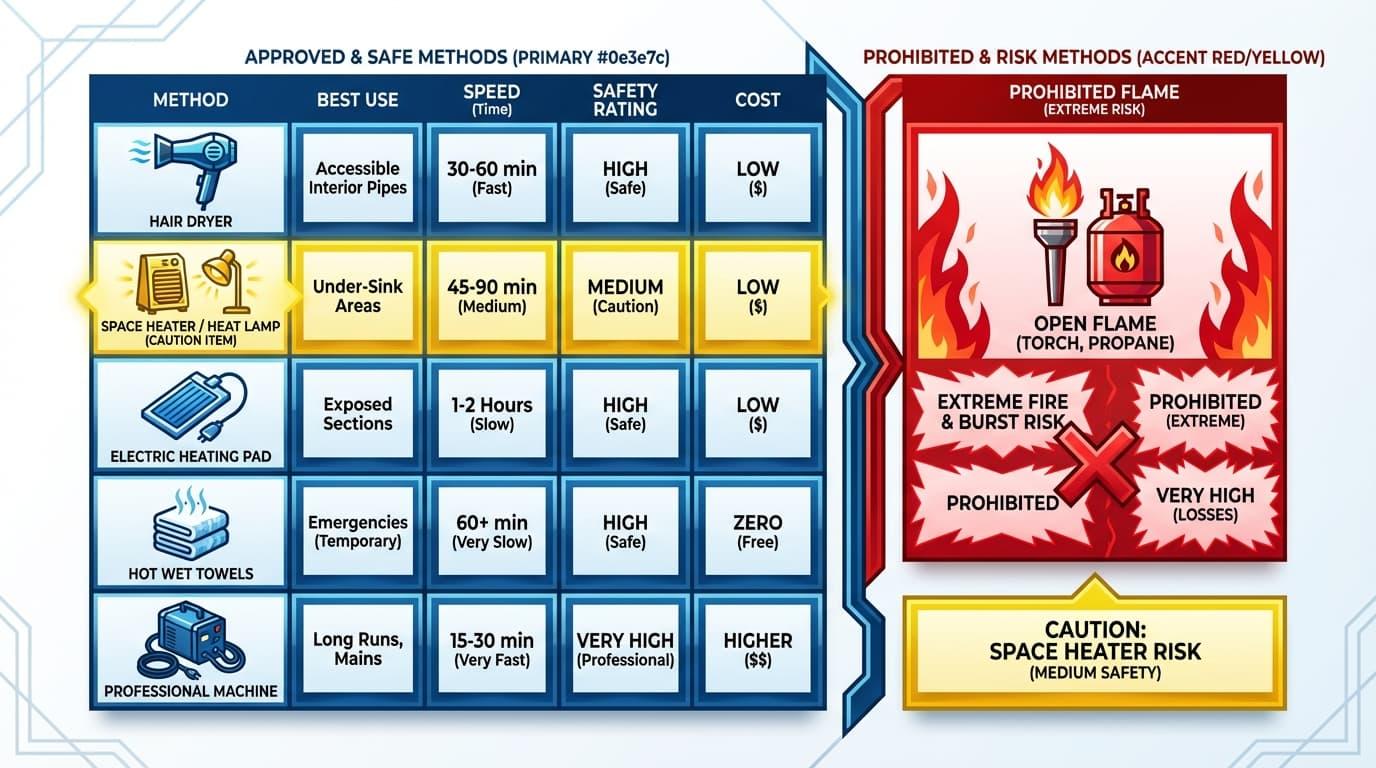
Utilize one of the following safe, gradual heat sources:
- Electric Hair Dryer: Set to low or medium heat, held 6 inches from the pipe, and kept in constant motion to prevent localized thermal shock.
- Electric Heating Pad: Wrapped tightly around the frozen segment to provide sustained, low-level conduction heat.
- Hot Water Towels: Thick rags soaked in hot (not boiling) water, wrapped around the pipe, and replaced every 10 minutes as they cool.
- Portable Space Heater: Positioned at least 3 feet away to safely warm the ambient air inside an open cabinet or crawl space.
Step 6: Follow Safety Rules
Keep all electrical cords and devices well away from standing water or puddles, and never leave space heaters or heat lamps unattended near flammable materials. Always maintain at least 3 feet of clearance between any heater and combustible items to reduce fire risk.
Never use a propane heater, charcoal stove, or any other open flame device on plumbing under any circumstances. Open flames dramatically increase the risk of fire, can damage pipes and fittings, and are specifically prohibited for thawing frozen pipes.
Step 7: Continue Until Full Water Flow Returns
Once water starts moving, keep warming the frozen area for another 10–15 minutes. You want to melt ice through the entire frozen section, not just crack open a small channel that might refreeze overnight.
Step 8: Turn Water Back On Slowly
With someone watching the previously frozen pipe, slowly restore flow from the main valve. Watch for leaks, drips, or weeping joints. Even small drips can signal pipe damage that needs professional attention.
Step 9: Document Any Damage
If you see cracks, damp drywall, water stains, or persistent low water pressure after thawing, take timestamped photos. These become important if you need to file an insurance claim or if hidden damage surfaces later.
How Do You Thaw Inaccessible Pipes in Walls, Underground, or Wells?
When frozen pipes are hidden or buried, your DIY options shrink fast. Knowing where the reasonable line is between trying yourself and calling for help can save you from turning a fixable problem into a much bigger one.
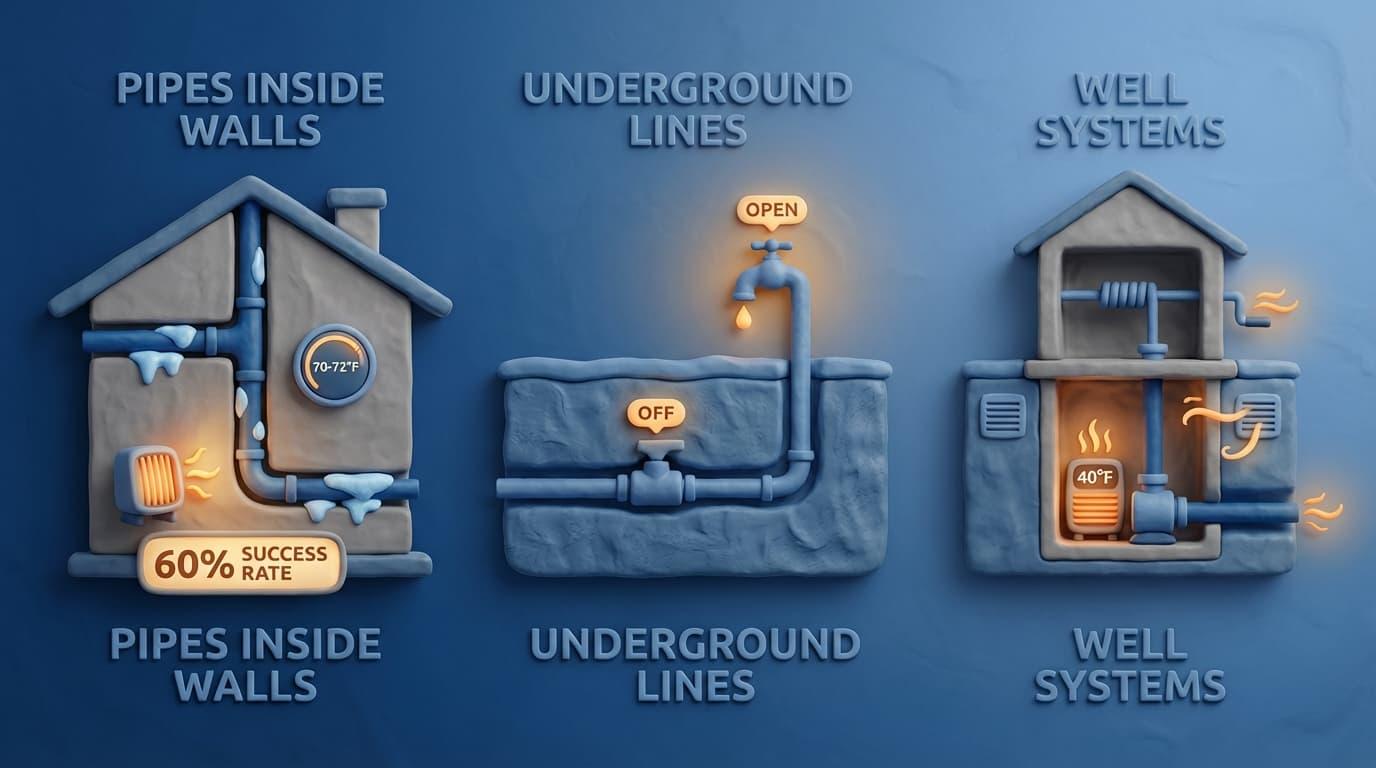
For Pipes Inside Walls
Raise your thermostat to around 70–72°F and give your HVAC time to warm the structure. Open cabinets beneath sinks on exterior walls to let heated air circulate around the pipes. This indirect approach can thaw embedded pipes over several hours without needing to open walls.
If you can identify a specific wall segment that feels unusually cold, aim a space heater at that surface from the room side. Keep it at a safe distance, never unattended, and expect the process to take 4–8 hours. Success rates for this method run around 60% — not guaranteed, but often worth trying before calling in a pro.
For Inaccessible Supply Lines
If the frozen section feeds an addition, upstairs bathroom, or distant fixture, try letting adjacent hot water and cold tap faucets run in a slow drip. This can sometimes create warm backflow that gradually softens ice in the frozen branch. It’s slow, but it’s far safer than improvised solutions.
For Underground Or Outdoor Lines
Irrigation systems, yard hydrants, and shallow water service lines present serious challenges. Underground pipes in Utah can be buried at 18–36 inches deep, which makes digging in winter a risk of collapse.
For underground or outdoor lines, such as irrigation systems, yard hydrants, and shallow water service lines, your best approach is to turn off the zone valves to the affected line, open exterior faucets and hose bibs to relieve pressure, and then wait for milder ambient temperatures, or call a plumber with professional pipe-thawing equipment.
Never attempt to dig up and torch-thaw a buried line. Professional hydro-excavation and steam lances exist for exactly this reason.
For Well Systems
Check your well house or pit for obvious freezing points — often at vents or where pipes exit the ground. A small enclosed space can be safely warmed with an electric space heater set to maintain a temperature of about 40°F. Keep indoor faucets open to monitor for the return of flow.
Basically, if there’s no progress within a reasonable timeframe, or the frozen section sits in a structural area like a load-bearing wall, slab, or deep-buried line, shut off your water service and call a licensed plumber. Professional thawing machines can clear 100-foot runs in 15–30 minutes with minimal risk.
Learn More About Our Plumbing Repair Services Today!
Which Pipe Thawing Methods Work Best (and Which Should Be Avoided)?
Not all thawing methods deliver the same results. Some are slow but safe. Others are fast but dangerous — or outright prohibited. Here’s how they stack up:
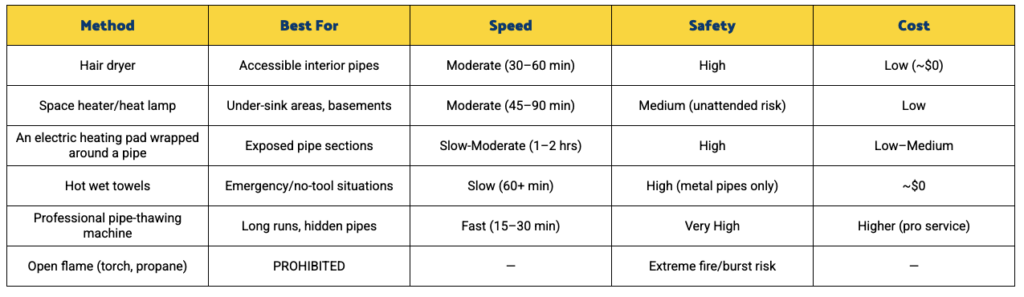
Hair Dryer
This is the go-to option for accessible pipes. A standard 1,200–1,800W electric hair dryer on low-to-medium setting can thaw a half-inch section in 20–45 minutes. Keep it moving to avoid hot spots, and never use it near standing water or puddles.
Space Heater Or Heat Lamp
Works well for warming cabinet interiors, basements, and utility rooms. Keep at least 3 feet from any flammable materials, and never leave it running unattended. Expect 45–90 minutes for results through convection warming.
Electric Heating Pad Or Heat Tape
Good for gently warming exposed pipe runs over a longer period. Self-regulating heat tape applies uniform contact heat at about 105°F. Once installed, heat tape also provides ongoing protection during future cold weather events — a worthwhile investment for pipes in exposed areas.
Warm Wet Towels
A no-tool emergency option. Towels soaked in hot water (not boiling) transfer heat slowly and need to be reapplied 4–6 times over about an hour. Safe for metal pipes, but avoid using it on plastic, where excess heat can cause warping.
Professional Equipment
Plumbers use specialized machines that send controlled electrical current through metal pipes, thawing long runs uniformly in minutes. These tools carry virtually zero fire risk and achieve 99% success rates — far better than DIY methods on difficult or hidden sections.
What To Never Use
Open flames like propane torches, charcoal stoves, or other open-flame devices are prohibited under most plumbing codes for good reason. They ignite framing, melt solder joints unevenly, and often leave the ice plug untouched while superheating adjacent sections. Pouring boiling water directly on plastic pipes causes thermal shock and cracking.
Any method involving electricity must stay away from puddles or leaks. Use heavy-duty extension cords rated for the load, and unplug immediately if you see water accumulating near your equipment.
What Are the Most Dangerous Mistakes to Avoid When Thawing Pipes?

Most serious frozen pipe damage doesn’t come from the initial freeze — it comes from how people try to fix it. Rushing the thaw or ignoring early warning signs creates problems far worse than the original blockage.
Heating Too Fast
Applying intense heat to a severely frozen pipe creates rapid thermal expansion. Temperature gradients exceeding 50°F per inch can crack pipe walls, and studies show this causes damage in roughly 30% of severe freeze cases. Slow, even warming is always the right approach.
Leaving Heaters Unattended
According to a 2021 report by the National Fire Protection Association (NFPA), unattended space heaters account for 22% of winter structure fires during pipe-thawing attempts.”
Using Open Flames
Torches, grills, and any other open flame devices near plumbing are never acceptable. Beyond the obvious fire risk, they heat pipes unevenly, can melt solder joints, and often leave the actual ice plug untouched while superheating adjacent sections.
Ignoring Electrical Hazards
Using a hair dryer while standing in water, or running electrical devices in a wet cabinet, dramatically increases shock risk. Even a small leak can create a dangerous situation. Always check for standing water before plugging anything in.
Missing Hidden Damage
After pipes freeze and thaw — especially repeatedly — micro-cracks can form at stress points. These tiny fissures may leak only a fraction of a gallon per hour, invisible inside walls. Within 48 hours at the right humidity, mold begins to grow. Hidden pipe damage often costs $5,000–$50,000 in remediation once it’s finally discovered.
Warning Signs To Take Seriously
A pipe that’s visibly bulging or water that suddenly stops and then returns on its own are both serious warning signs that pressure is building inside your plumbing. These symptoms often appear during or right after a hard freeze and can mean a pipe is on the verge of failing.
You should also take damp spots on walls or ceilings seriously, especially after temperatures rise and pipes begin to thaw. Moisture appearing where it wasn’t before can indicate a hidden leak inside walls, ceilings, or floors, which can quickly lead to mold or structural damage if ignored.
Persistent low water pressure after you’ve thawed pipes is another red flag that something isn’t right. Any of these situations means you should shut off the water and call a plumber promptly — don’t wait to see if it clears on its own, because delays can turn a manageable repair into a major water-damage event.
Learn More About Our Plumbing Repair Services Today!
How To Stop It From Happening Again: Frozen Pipe Prevention
Prevention costs a fraction of what repair does. With average water damage claims running $15,400 — and some reaching over a million dollars — a few hundred dollars in preparation before the next cold snap is money well spent.
Insulate Vulnerable Pipes
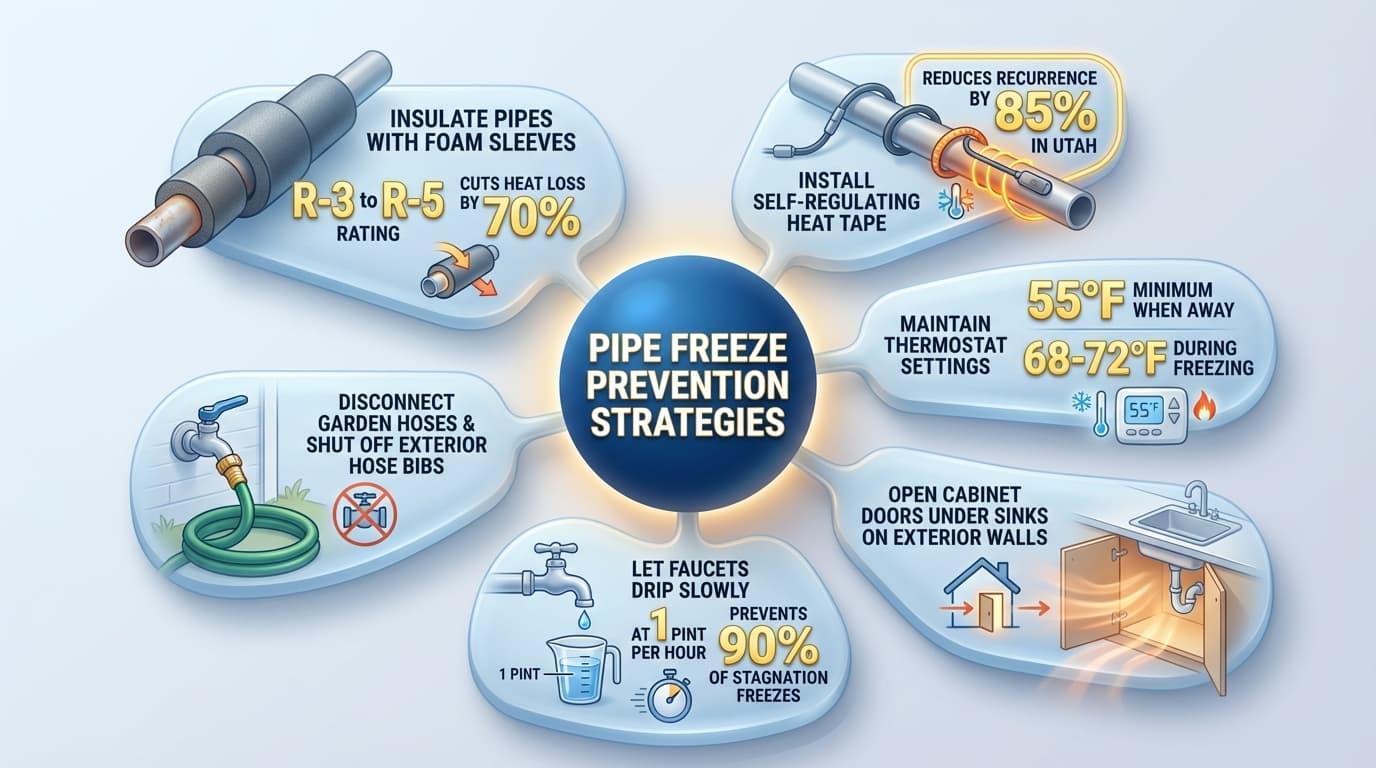
Focus on water supply lines in basements, crawl spaces, garages, and along exterior walls. Foam pipe sleeves (R-3 to R-5 rating) cut heat loss by up to 70% on exposed sections. Pay extra attention to pipes near foundation vents, garage doors, and any areas that feel drafty during cold weather.
Install Heat Tape Where Needed
Self-regulating heat tape automatically activates when temperatures drop and shuts off when they rise. Properly installed, it has reduced frozen pipe recurrence by 85% in Utah, according to vendor data. Follow manufacturer instructions carefully — improper installation creates fire risk.
Maintain Indoor Temperatures
Keep your thermostat no lower than about 55°F when away, and aim for 68–72°F during extended periods of freezing temperatures. This keeps pipe cores above the danger zone, even in walls along exterior surfaces. For second homes in Park City and similar high-elevation areas, smart thermostats with temperature alerts are worth every penny.
Simple Habits That Help:
Simple habits make a big difference in preventing frozen pipes. Open cabinet doors under sinks on exterior walls during arctic blasts to allow warm indoor air to circulate around vulnerable plumbing.
Let a faucet drip slowly overnight — even a small flow of about 1 pint per hour prevents roughly 90% of stagnation-related freezes by keeping water moving instead of sitting still and turning to ice.
Before winter arrives, disconnect all garden hoses and shut off exterior hose bibs, then drain irrigation systems, pool plumbing, and backflow preventers completely before the first hard freeze.
Removing standing water from exposed and outdoor lines eliminates many of the weak points where pipes most often freeze and burst, helping you avoid costly mid-winter emergencies.
Check Vulnerable Areas Regularly
During extended cold weather, briefly walk through crawl spaces and mechanical rooms and look for frost on pipes or unusually cold drafts. Catching a problem at the “cold pipe” stage is far cheaper than discovering it at the “burst pipe” stage.
When Does Insurance Cover Frozen Pipes and When Should You Call a Plumber?
Many frozen pipe situations can be handled at home. But there’s a clear line where professional help — and your insurance policy — should come into the picture before you continue.
When To Call A Licensed Plumber Immediately
Call a licensed plumber immediately if you have no water at all in your home while neighbors still have service, as this likely indicates a frozen main line.
You should also call right away if the frozen section appears to be hidden inside walls, ceilings, or underground; if you see visible bulging, cracks, or frost lines that suggest an imminent rupture; if water stains or dripping appear anywhere after you’ve started thawing; or if full water pressure doesn’t return after your thawing attempts.
Professional plumbers have tools that homeowners simply don’t. Infrared cameras locate hidden ice blockages with 0.1°F resolution. Specialized pipe-thawing machines deliver controlled current that clears 100-foot metal runs in minutes. These tools prevent unnecessary demolition and reduce the risk of making things worse.
Learn More About Our Plumbing Repair Services Today!
Insurance Considerations
If damage occurs, documentation matters. Take timestamped photos and videos of the following:
- The frozen area before you start working
- Any visible pipe damage or ice
- Water damage to walls, floors, or belongings
- Your drying and mitigation efforts
Most homeowner’s policies require you to maintain adequate heat or shut off the water supply if leaving for extended periods. Failure to do so — like setting your thermostat below 55°F while on vacation — can result in a claim denial for “neglect.” After the immediate emergency is handled, review your policy or speak with your insurance agent. Coverage varies significantly between policies.
The Right Way To Think About Professional Help
Calling a plumber when the stakes are high isn’t admitting defeat — it’s what prepared homeowners do. When a frozen section sits behind drywall in a load-bearing wall, or when a burst threatens thousands of dollars in water damage, professional intervention is the smart call.
Local plumbers with decades of experience in Utah’s specific conditions — the temperature swings, the elevation effects, the soil behavior — bring knowledge that generic national guidance simply can’t match.
FAQs
How Long Does It Usually Take To Thaw Frozen Pipes?
For accessible interior pipes, expect 30–60 minutes with steady, gentle heat from a hair dryer or heating pad. Pipes embedded in walls may take several hours using indirect warming methods like raising your thermostat and opening cabinets. Underground or deeply hidden pipes often won’t thaw safely without professional equipment — attempting DIY thawing on these can take all day with no guarantee of success.
Is It Safe To Use A Heat Gun Instead Of A Hair Dryer?
Heat guns typically operate at much higher temperatures than hair dryers — often 500°F or more versus 140°F. This dramatically increases the risk of pipe damage, melted joints, and fire. A standard household hair dryer is almost always the safer choice. If you must use a heat gun, keep it on the lowest setting, stay several inches away from the pipe, and keep it moving constantly.
What If My Pipe Is Frozen But Not Burst — Do I Still Need A Plumber?
If the pipe is accessible, shows no signs of bulging or cracks, and you successfully restore water flow, you can often handle it yourself. However, if the pipe is hidden in a wall, has refrozen multiple times this season, or serves a critical line like your main water service, having a plumber inspect it makes sense. Repeated freeze-thaw cycles create micro-cracks that cause slow leaks inside walls — damage you won’t see until mold appears months later.
Can I Pour Hot Or Boiling Water Down A Frozen Drain To Thaw It?
Moderately hot tap water is generally safe for metal drains and can help melt ice in p-traps. But boiling water can thermal-shock some fixtures and damage PVC drain lines. A safer approach: use warm (not boiling) water combined with time, and apply gentle external heat to exposed sections of the drain line. Never pour boiling water directly onto plastic water pipes — the thermal stress can cause cracking.
Why Did My Pipes Freeze Overnight When They’ve Been Fine In Past Winters?
Several factors combine to push previously “safe” pipes over the edge. Temperatures may have dropped lower than usual, or sustained cold lasted longer. Wind dramatically increases heat loss from exposed areas. Small changes — a new draft from settling, insulation that’s compressed or shifted, a thermostat set a few degrees lower than last year — all shrink the margin between “cold pipe” and “frozen pipe.”
Based on our 20+ years of plumbing dispatch data along the Wasatch Front, a 30°F temperature swing in a single day is the primary trigger for burst pipes. In our 2024 service calls, 70% of major floods occurred because homeowners missed early warning signs after a rapid freeze-thaw cycle.